Passive2:Visualized Components: Unterschied zwischen den Versionen
SebSta (Diskussion | Beiträge) |
Keine Bearbeitungszusammenfassung |
||
| (17 dazwischenliegende Versionen von einem anderen Benutzer werden nicht angezeigt) | |||
| Zeile 1: | Zeile 1: | ||
[[Bild:Passive-viscomp.png]] | [[Bild:Passive-viscomp.png]] | ||
All components of the building | All components of the building that require a definition of structure, material or environment are listed under "Visualized Components" and need to be edited here. Clicking on the respective component in the entry table or the in the navigation tree opens the component. In the input window the component’s properties are defined. There are three possible types: | ||
* Opaque components (walls) | * Opaque components (walls) | ||
| Zeile 7: | Zeile 7: | ||
* Openings (not relevant) | * Openings (not relevant) | ||
Each type | Each type requires different input data. There are also some differences for opaque components, depending on whether or not their surface is in contact with outer air. | ||
== Opaque == | == Opaque == | ||
| Zeile 13: | Zeile 13: | ||
=== General === | === General === | ||
[[Bild:Passive-viscomp_opaque_general.png|right|Opaque General]] | [[Bild:Passive-viscomp_opaque_general.png|right|Opaque General]] | ||
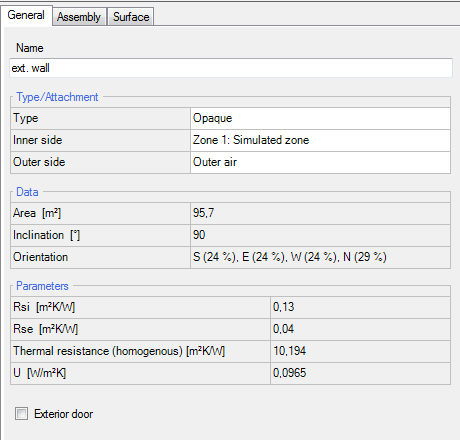
The first part in the general tab is always the same and unaffected by | The first part in the general tab is always the same and unaffected by the type of component chosen. The first line defines whether the component is [[Passive2:Visualized Components#Opqaue|opaque]],[[Passive2:Visualized Components#Transparent|transparent]] or [[Passive2:Visualized Components#Open|open]]. The next two lines define the climates on each side of the component. To check which side is outer and which is inner side, see this [[movie|movie]]. In this example picture, an exterior wall is shown. Thus the inner side is defined as [[Passive2:Zone 1|zone 1, the simulated zone]] and on the outside, outer air, which is the climate for the chosen project location.<br> | ||
<br> | <br> | ||
The data and the parameter section summarize and calculate some of the input data such as the area, inclination, orientation and the | The data and the parameter section summarize and calculate some of the input data such as the area, inclination, orientation and the thermal characteristic values of the component. | ||
<br style="clear:both" /> | <br style="clear:both" /> | ||
=== Assembly === | === Assembly === | ||
The assembly tab works very much like the | The assembly tab works very much like the one in WUFI®Plus, so for further info, you can go to the respective subpoint of visualized components of [[Plus_2.X:Visualized_Components#Assembly|WUFI®Plus]] or to the [[Plus:Dialog_DatabaseAssemblies|assembly database]]. | ||
=== Surface === | === Surface === | ||
[[Bild:Passive-viscomp_opaque_surface.png|right|Opaque surface]] | [[Bild:Passive-viscomp_opaque_surface.png|right|Opaque surface]] | ||
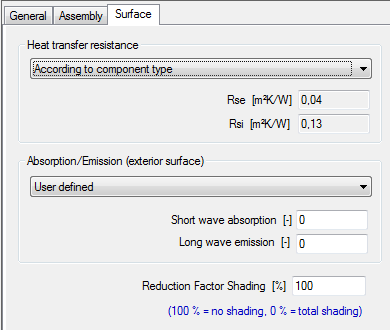
The surface type usually only consists of the "Heat transfer resistance" section, but if the chosen assembly has contact | The surface type usually only consists of the "Heat transfer resistance" section, but if the chosen assembly has contact with the outer climate, the second section appears.<br> | ||
In the first section, | In the first section, Rse and Rsi values can be either defined by WUFI by selecting the "According to component type" scope or user defined by choosing the respective scope. | ||
==== Exterior walls/doors ==== | ==== Exterior walls/doors ==== | ||
When the chosen assembly is in contact to the outer air, the "Solar absorption/emission" section appears. Here the short wave absorption and the long-wave emission of the exterior component can be defined. WUFI also has a selection of different materials with predefined values. You can find them by clicking on the scope.<br><br> | |||
The shading reduction factor indicates | The shading reduction factor indicates how much solar radiation is blocked by shading objects. An entry of 1 means 100% of the solar radiation hits the component whereas 0 means total shading. If your exterior wall has different shading factors depending on the orientation, it is advisable to divide the exterior wall into different components so you're able to define the factor to each wall individually. | ||
<br style="clear:both" /> | |||
== Transparent == | == Transparent == | ||
=== General === | |||
The transparent general tab only differs from the opaque general tab in two points. The parameters section contains only one value, the Uw value of the window. Beneath, there are construction Psi-values for each side of the frame. These values can either be defined by window parameters or defined by user by removing the tick.<br> | |||
Note: For different installation conditions you can modify the Psi-value tab and still use the same database entry. Setting the Psi-value to 0 means no frame-wall connection on this side. | |||
=== Window parameters === | |||
This section does not differ a lot from WUFI®Plus. Here is a link to the respective [[Plus_2.X:Visualized_Components#Window_Parameters|section]] of visualized components of WUFI®Plus and a link to the WUFI®Plus window [[Plus:Dialog_DatabaseWindows|database]]. | |||
=== Solar Protection === | |||
This tab contains all information about obstructions or devices that reduce the radiation on the windows. | |||
==== General ==== | |||
[[Bild:Passive-viscomp_trans_solprot_general.png|right|Solar Proection General]] | |||
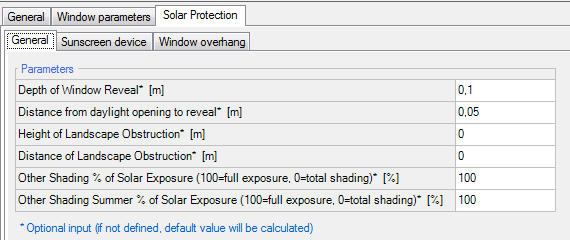
The parameters in this section are dependent on solar obstructions and the way the windows are installed in the wall. Also additional shading effects and a special summer shading effect can be implemented. | |||
==== Sunscreen device ==== | |||
Additional shading effects caused by a sunscreen device can be input here. | |||
==== Window overhang ==== | |||
A window overhang can be implemented here. Use the dimensions of the overhang which affects the window most.<br> | |||
Note: If no overhang is specified, the dimensions of the reveal are automatically taken as the overhang. | |||
<br style="clear:both" /> | |||
== Open == | == Open == | ||
Creates an open hole. Has a different influence on the building than transparent components. | |||
Aktuelle Version vom 22. Mai 2014, 22:58 Uhr
All components of the building that require a definition of structure, material or environment are listed under "Visualized Components" and need to be edited here. Clicking on the respective component in the entry table or the in the navigation tree opens the component. In the input window the component’s properties are defined. There are three possible types:
- Opaque components (walls)
- Transparent components (windows)
- Openings (not relevant)
Each type requires different input data. There are also some differences for opaque components, depending on whether or not their surface is in contact with outer air.
Opaque
General

The first part in the general tab is always the same and unaffected by the type of component chosen. The first line defines whether the component is opaque,transparent or open. The next two lines define the climates on each side of the component. To check which side is outer and which is inner side, see this movie. In this example picture, an exterior wall is shown. Thus the inner side is defined as zone 1, the simulated zone and on the outside, outer air, which is the climate for the chosen project location.
The data and the parameter section summarize and calculate some of the input data such as the area, inclination, orientation and the thermal characteristic values of the component.
Assembly
The assembly tab works very much like the one in WUFI®Plus, so for further info, you can go to the respective subpoint of visualized components of WUFI®Plus or to the assembly database.
Surface

The surface type usually only consists of the "Heat transfer resistance" section, but if the chosen assembly has contact with the outer climate, the second section appears.
In the first section, Rse and Rsi values can be either defined by WUFI by selecting the "According to component type" scope or user defined by choosing the respective scope.
Exterior walls/doors
When the chosen assembly is in contact to the outer air, the "Solar absorption/emission" section appears. Here the short wave absorption and the long-wave emission of the exterior component can be defined. WUFI also has a selection of different materials with predefined values. You can find them by clicking on the scope.
The shading reduction factor indicates how much solar radiation is blocked by shading objects. An entry of 1 means 100% of the solar radiation hits the component whereas 0 means total shading. If your exterior wall has different shading factors depending on the orientation, it is advisable to divide the exterior wall into different components so you're able to define the factor to each wall individually.
Transparent
General
The transparent general tab only differs from the opaque general tab in two points. The parameters section contains only one value, the Uw value of the window. Beneath, there are construction Psi-values for each side of the frame. These values can either be defined by window parameters or defined by user by removing the tick.
Note: For different installation conditions you can modify the Psi-value tab and still use the same database entry. Setting the Psi-value to 0 means no frame-wall connection on this side.
Window parameters
This section does not differ a lot from WUFI®Plus. Here is a link to the respective section of visualized components of WUFI®Plus and a link to the WUFI®Plus window database.
Solar Protection
This tab contains all information about obstructions or devices that reduce the radiation on the windows.
General

The parameters in this section are dependent on solar obstructions and the way the windows are installed in the wall. Also additional shading effects and a special summer shading effect can be implemented.
Sunscreen device
Additional shading effects caused by a sunscreen device can be input here.
Window overhang
A window overhang can be implemented here. Use the dimensions of the overhang which affects the window most.
Note: If no overhang is specified, the dimensions of the reveal are automatically taken as the overhang.
Open
Creates an open hole. Has a different influence on the building than transparent components.
