Plus 2.X:Building Wizard: Unterschied zwischen den Versionen
Krizzl (Diskussion | Beiträge) |
Krizzl (Diskussion | Beiträge) |
||
| (4 dazwischenliegende Versionen desselben Benutzers werden nicht angezeigt) | |||
| Zeile 1: | Zeile 1: | ||
= Building = | == Building == | ||
The most important part of WUFI-Plus is the option to create a building. | The most important part of WUFI-Plus is the option to create a building. | ||
The design of the building can be created in two ways. The easier way is to use the automatic building wizard. With this tool it is possible to design simple footprints and typical roof and cellar constructions. When the footprint and building construction is more complicated as the available samples there is the possibility to design the building using vertices. Also it is possible to create a simple building using the Building wizard and then to expand it using vertices. | The design of the building can be created in two ways. The easier way is to use the automatic building wizard. With this tool it is possible to design simple footprints and typical roof and cellar constructions. When the footprint and building construction is more complicated as the available samples there is the possibility to design the building using vertices. Also it is possible to create a simple building using the Building wizard and then to expand it using [[Plus 2.X:Building#Edit 3D|vertices.]] | ||
== Automatic building wizard == | == Automatic building wizard == | ||
| Zeile 11: | Zeile 11: | ||
[[Bild:P2-Building_Wizard.png]] | [[Bild:P2-Building_Wizard.png]] | ||
===Defining the Geometry=== | |||
With the automatic building wizard three essential points of a building can be defined, the footprint, the roof and the bottom offset. First of all you have to choose one of the proposed '''Main section''', '''Roof''' and '''Bottom offset'''. The yellow parts in the illustrations are the heated zone and the white parts are unheated zones. | |||
After this you can define the dimensions of the building. Below the selection graphs, given measures can be specified. These vary with the choice of footprint, roof and bottom offset. Also under '''Main section''' the story height and the number of stories can be defined. Under '''Roof''' there is the possibility to check mark the entry "Gable ends" for a gable roof. | |||
On the bottom side of the dialog the orientation of the main facade needs to be defined either by means of main orientations or by Azimuth. The main facade depends on the footprint of the building and is shown in the selection graph for the footprint selection. | |||
[[image:SelectionRoof.png|thumb|left|Different choosable roofs]] | This is a overview over the possibilities the Building Wizard offers: | ||
{| | |||
|'''Footprint Selection''' | |||
| | |||
|'''Roof Selection''' | |||
| | |||
|'''Bottom Offset Selection''' | |||
|- | |||
|[[image:SelectionFootprint.png|thumb|left|Different choosable footprints]] | |||
| | |||
|[[image:SelectionRoof.png|thumb|left|Different choosable roofs]] | |||
| | |||
|[[image:SelectionBottom.png|thumb|left|Different choosable bottom offsets]] | |||
|} | |||
===Defining the Orientation=== | |||
== | |||
On the bottom side of the dialog the orientation of the main facade needs to be defined either by means of main orientations or by Azimuth. The main facade depends on the footprint of the building and is shown in the selection graph for the footprint selection. | |||
===Other Options=== | |||
On the | On the right side there are two other options: <br> | ||
'''"Group Components"''': There is a Possibility to automatically group similar components, for example exterior walls. They are seen as one component then so for example not each single part of the exterior wall needs to be assigned with an assembly in particular. Ungrouping components is possible in the [[Plus 2.X:Building#Component Operations|Visualization Box]] | |||
(. | '''"Divide into Stories"''': If the Building has got more than one story you can decide whether each story should have its "own" components (set the check mark) or whether the components shouldn't be parted (remove check mark). | ||
Aktuelle Version vom 28. April 2011, 12:05 Uhr
Building
The most important part of WUFI-Plus is the option to create a building.
The design of the building can be created in two ways. The easier way is to use the automatic building wizard. With this tool it is possible to design simple footprints and typical roof and cellar constructions. When the footprint and building construction is more complicated as the available samples there is the possibility to design the building using vertices. Also it is possible to create a simple building using the Building wizard and then to expand it using vertices.
Automatic building wizard
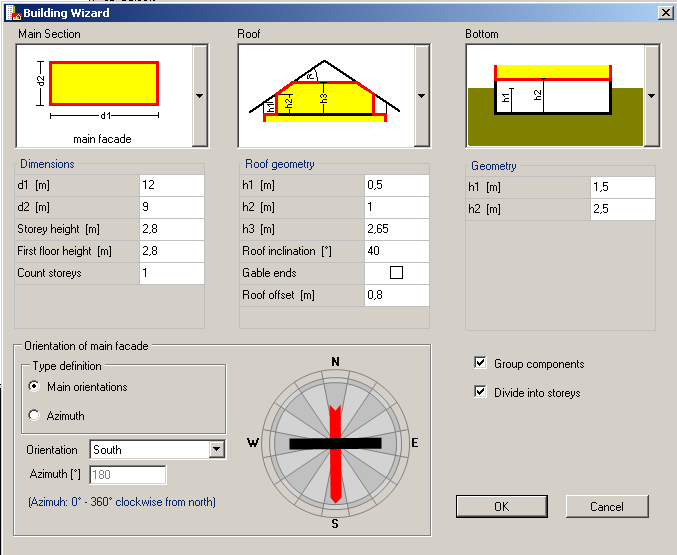
The Building Wizard is a tool to design a house for the simulation.
Defining the Geometry
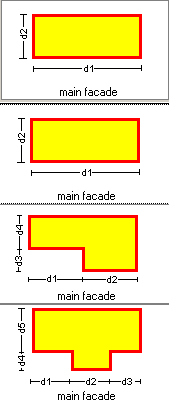
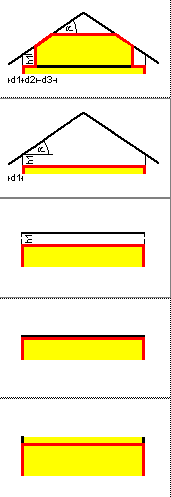
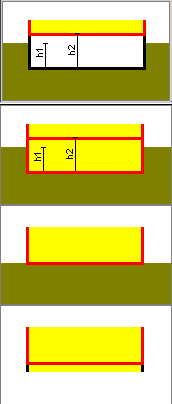
With the automatic building wizard three essential points of a building can be defined, the footprint, the roof and the bottom offset. First of all you have to choose one of the proposed Main section, Roof and Bottom offset. The yellow parts in the illustrations are the heated zone and the white parts are unheated zones.
After this you can define the dimensions of the building. Below the selection graphs, given measures can be specified. These vary with the choice of footprint, roof and bottom offset. Also under Main section the story height and the number of stories can be defined. Under Roof there is the possibility to check mark the entry "Gable ends" for a gable roof.
On the bottom side of the dialog the orientation of the main facade needs to be defined either by means of main orientations or by Azimuth. The main facade depends on the footprint of the building and is shown in the selection graph for the footprint selection.
This is a overview over the possibilities the Building Wizard offers:
| Footprint Selection | Roof Selection | Bottom Offset Selection | ||
 |
 |
 |
Defining the Orientation
On the bottom side of the dialog the orientation of the main facade needs to be defined either by means of main orientations or by Azimuth. The main facade depends on the footprint of the building and is shown in the selection graph for the footprint selection.
Other Options
On the right side there are two other options:
"Group Components": There is a Possibility to automatically group similar components, for example exterior walls. They are seen as one component then so for example not each single part of the exterior wall needs to be assigned with an assembly in particular. Ungrouping components is possible in the Visualization Box
"Divide into Stories": If the Building has got more than one story you can decide whether each story should have its "own" components (set the check mark) or whether the components shouldn't be parted (remove check mark).
