Plus 2.X:Profile: Unterschied zwischen den Versionen
Krizzl (Diskussion | Beiträge) |
Krizzl (Diskussion | Beiträge) |
||
| (5 dazwischenliegende Versionen desselben Benutzers werden nicht angezeigt) | |||
| Zeile 8: | Zeile 8: | ||
The way to proceed is demonstrated using the example of the | The way to proceed is demonstrated using the example of the [[Plus 2.X:Design_Conditions#Heating|heating]]. <br> | ||
[[Bild:P2-periods1.png|frame|Image1: The standard entry |left]] [[Bild:P2-periods2.png|frame|Image 2: Modified profile]] | [[Bild:P2-periods1.png|frame|Image1: The standard entry |left]] [[Bild:P2-periods2.png|frame|Image 2: Modified profile]] | ||
<br style="clear:both" /> | <br style="clear:both" /> | ||
As almost no building is used the same way all week long, defining | As almost no building is used the same way all week long, defining different periods is almost always reasonable. By clicking on "New" a new period, which can be varied in the designated way, is created. | ||
The lowest period is always read first, and for days or periods not defined by it, the next higher is effective. So in this example the lower period defines the weekdays whereas the upper one defines the weekends (or in other words: the periods not defined by the lower one)(See Image2) | The lowest period is always read first, and for days or periods not defined by it, the next higher is effective. So in this example the lower period defines the weekdays whereas the upper one defines the weekends (or in other words: the periods not defined by the lower one)(See Image2) | ||
Then for every period an adequate day-profile should be created. New hour-profiles are also created using the "New" Button. Now hours need to be entered. In this example for the second period (which defines the weekdays) a day-profile is created that splits the day into three fractions of time: from midnight to 7 'o clock, from 7'o clock to 18 'o clock and from 18 'o clock to midnight. For each fraction of time the desired minimum temperature is entered. | Then for every period an adequate day-profile should be created. New hour-profiles are also created using the "New" Button. Now hours need to be entered. In this example for the second period (which defines the weekdays) a day-profile is created that splits the day into three fractions of time: from midnight to 7 'o clock, from 7'o clock to 18 'o clock and from 18 'o clock to midnight. For each fraction of time the desired minimum temperature is entered. | ||
So on weekdays the temperature isn't meant t fall below 21 degrees from 7a.m. to 6p.m.(working hours) and below 17 degrees the rest of the time. During the weekends a minimum temperature of 17 degrees is requested (See Image1). | So on weekdays the temperature isn't meant t fall below 21 degrees from 7a.m. to 6p.m.(working hours) and below 17 degrees the rest of the time. During the weekends a minimum temperature of 17 degrees is requested (See Image1). | ||
===Example: Periods=== | ===Example: Periods=== | ||
| Zeile 34: | Zeile 34: | ||
===The Buttons === | ===The Buttons === | ||
[[Bild:P2-profilesabe.png|right]]Periods can be inserted in between others or in exchange for others. It is possible to specify | [[Bild:P2-profilesabe.png|right]]Periods can be inserted in between others or in exchange for others. It is possible to specify whether the new period should be inserted after, before or in exchange for the highlighted one and by clicking on the "Insert" or "New" Button. The Operations "Copy" and "Delete" can also be applied to highlighted periods. | ||
===Movies=== | |||
Watch these two movies to see how profiles are created for inner loads. | |||
The movies belong to the [[Plus 2.X:Input#Inner Loads (STEP seven)|second example]] of the tutorial. | |||
*[http://www.wufi-wiki.com/wufifilme/step7_innerloads/z1/step7_innerloads_z1.htm '''MOVIE:INNER LOADS ZONE 1''']<br> | |||
*[http://www.wufi-wiki.com/wufifilme/step7_innerloads/z2/step7_innerloads_z2.htm '''MOVIE:INNER LOADS ZONE 2'''] | |||
Aktuelle Version vom 27. März 2012, 12:15 Uhr
Creation of adequate periods and day-profiles
Under the Tree entries Inner Loads/Occupancy, Design Conditions and HVAC it may be important to create adequate periods and day-profiles of usage of the building and building requirements.
Example: Creating an adequate schedule for the heating
The way to proceed is demonstrated using the example of the heating.


As almost no building is used the same way all week long, defining different periods is almost always reasonable. By clicking on "New" a new period, which can be varied in the designated way, is created.
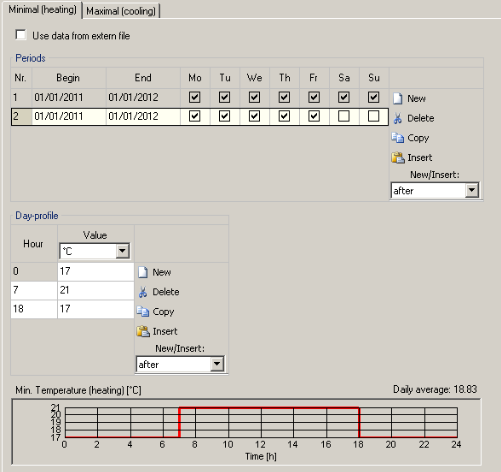
The lowest period is always read first, and for days or periods not defined by it, the next higher is effective. So in this example the lower period defines the weekdays whereas the upper one defines the weekends (or in other words: the periods not defined by the lower one)(See Image2)
Then for every period an adequate day-profile should be created. New hour-profiles are also created using the "New" Button. Now hours need to be entered. In this example for the second period (which defines the weekdays) a day-profile is created that splits the day into three fractions of time: from midnight to 7 'o clock, from 7'o clock to 18 'o clock and from 18 'o clock to midnight. For each fraction of time the desired minimum temperature is entered.
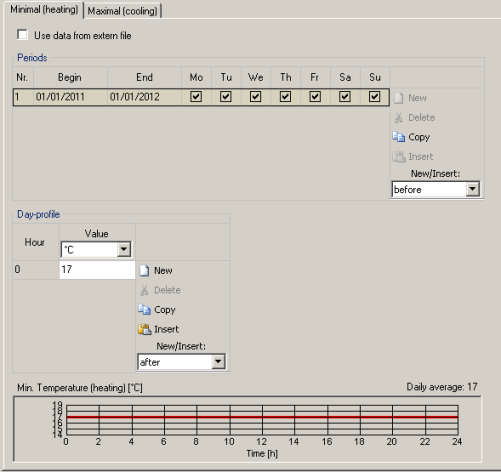
So on weekdays the temperature isn't meant t fall below 21 degrees from 7a.m. to 6p.m.(working hours) and below 17 degrees the rest of the time. During the weekends a minimum temperature of 17 degrees is requested (See Image1).
Example: Periods
The following example should illustrate the way the periods are read.
The lowest period saves the information for the weekdays from January 1st to May 1st (2011). The next higher one has every day checkmarked but is only effective for weekends from January 1st to May 1st (2011), as the lowest already contains information for the weekdays. The second period therefore defines the weekdays from May 2nd 2011 to January 1st in 2012. The weekends from May 2nd 2011 to January 1st 2012 ( or generally speaking: all that has been left out by the lower periods) are defined by the information saved in the first period.
The Buttons

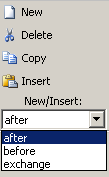
Periods can be inserted in between others or in exchange for others. It is possible to specify whether the new period should be inserted after, before or in exchange for the highlighted one and by clicking on the "Insert" or "New" Button. The Operations "Copy" and "Delete" can also be applied to highlighted periods.
Movies
Watch these two movies to see how profiles are created for inner loads. The movies belong to the second example of the tutorial.
