Plus:Dialog BuildingWizard: Unterschied zwischen den Versionen
Len (Diskussion | Beiträge) |
Tes (Diskussion | Beiträge) |
||
| (4 dazwischenliegende Versionen von 2 Benutzern werden nicht angezeigt) | |||
| Zeile 1: | Zeile 1: | ||
= Building = | = Building = | ||
The most important part of WUFI-Plus is the option to create a building | The most important part of WUFI-Plus is the option to create a building. | ||
The design of the building can create by two ways. The easier way is to use the automatic tool of the wizard. With this tool it is possible to design simple footprints and typical roof and cellar constructions. When the footprint and building construction is more complicated as the available samples there is the possibility to design the building over a script. | The design of the building can create by two ways. The easier way is to use the automatic tool of the wizard. With this tool it is possible to design simple footprints and typical roof and cellar constructions. When the footprint and building construction is more complicated as the available samples there is the possibility to design the building over a script. | ||
== Automatic building wizard == | |||
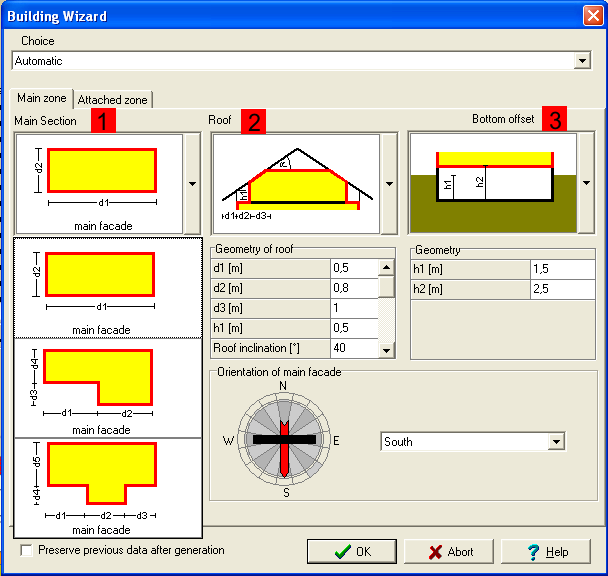
The '''Building Wizard''' is a tool to design a house for the simulation. | |||
[[Bild:WUFI-Plus_BuidingWizard.png]] | [[Bild:WUFI-Plus_BuidingWizard.png]] | ||
With the automatic building wizard three essential points of a building can define, the footprint, the roof and the | With the automatic building wizard three essential points of a building can define, the footprint, the roof and the bottom offset. First of all you have to choose one of the proposed '''Main section''' <FONT COLOR="#FF0000"><B>(1)</B></FONT>, '''Roof''' <FONT COLOR="#FF0000"><B>(2)</B></FONT>or '''Bottom offset''' <FONT COLOR="#FF0000"><B>(3)</B></FONT>. After this you can define the dimensions of the building. The yellow parts of the building are the heated zone and the white parts are unheated zones. | ||
Below the selection graphs, given measures can be specified. These vary with the choice of footprint, roof or bottom offset. | |||
After defining these the storey height and the number of stories can be defined on the left bottom side of the dialog. On the bottom right side of the dialog the orientation of the main facade needs to be defined. The main facade depends on the footprint of the building and is shown in the selection graph for the footprint selection. | |||
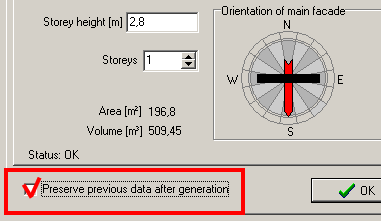
If a building needs to get modified it is important to check the "Preserve previous data after generation" button on the very bottom on the left like shown on the right side, if it is not wanted to overwrite all previous settings for assemblies and windows and so on. | |||
[[image:DialogBuildingWizard_PreservePreviousData.png |Check box to preserve previous data]] | |||
=== Footprint Selection === | |||
[[image:SelectionFootprint.png|thumb|left|Different choosable footprints]] | |||
These footprints can actually be choosen in the Building Wizard. | |||
<br style="clear:both" /> | |||
=== Roof Selection === | |||
[[image:SelectionRoof.png|thumb|left|Different choosable roofs]] | |||
These roofs can actually be choosen in the Building Wizard. | |||
<br style="clear:both" /> | |||
=== Bottom Offset Selection === | |||
[[image:SelectionBottom.png|thumb|left|Different choosable bottom offsets]] | |||
These bottom offsets can actually be choosen in the Building Wizard. | |||
<br style="clear:both" /> | |||
=== Unheated zones === | |||
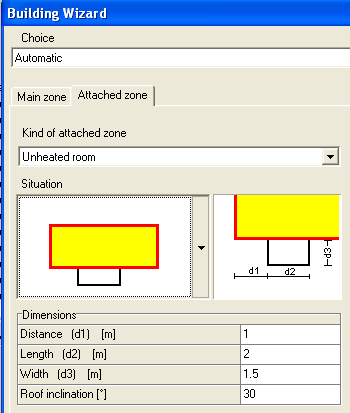
If you want to design an unheated attached zone, like a wintergarden you can do this with the page '''Attached zone''' in the building wizard. | If you want to design an unheated attached zone, like a wintergarden you can do this with the page '''Attached zone''' in the building wizard. | ||
[[Bild:WUFI-Plus_BuildingWizard_attached.png]] | [[Bild:WUFI-Plus_BuildingWizard_attached.png]] | ||
Aktuelle Version vom 1. Juli 2009, 12:00 Uhr
Building
The most important part of WUFI-Plus is the option to create a building.
The design of the building can create by two ways. The easier way is to use the automatic tool of the wizard. With this tool it is possible to design simple footprints and typical roof and cellar constructions. When the footprint and building construction is more complicated as the available samples there is the possibility to design the building over a script.
Automatic building wizard
The Building Wizard is a tool to design a house for the simulation.
With the automatic building wizard three essential points of a building can define, the footprint, the roof and the bottom offset. First of all you have to choose one of the proposed Main section (1), Roof (2)or Bottom offset (3). After this you can define the dimensions of the building. The yellow parts of the building are the heated zone and the white parts are unheated zones.
Below the selection graphs, given measures can be specified. These vary with the choice of footprint, roof or bottom offset.
After defining these the storey height and the number of stories can be defined on the left bottom side of the dialog. On the bottom right side of the dialog the orientation of the main facade needs to be defined. The main facade depends on the footprint of the building and is shown in the selection graph for the footprint selection.
If a building needs to get modified it is important to check the "Preserve previous data after generation" button on the very bottom on the left like shown on the right side, if it is not wanted to overwrite all previous settings for assemblies and windows and so on.
Footprint Selection
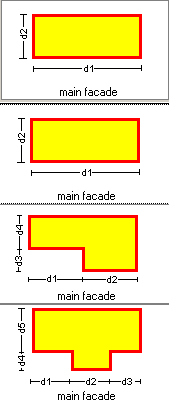
These footprints can actually be choosen in the Building Wizard.
Roof Selection
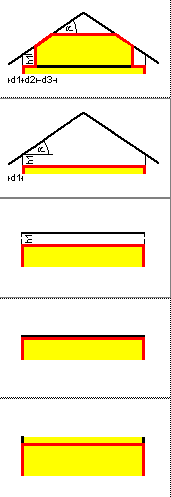
These roofs can actually be choosen in the Building Wizard.
Bottom Offset Selection
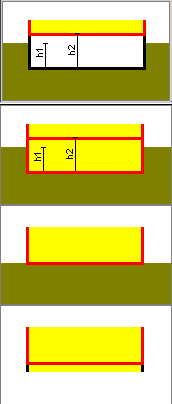
These bottom offsets can actually be choosen in the Building Wizard.
Unheated zones
If you want to design an unheated attached zone, like a wintergarden you can do this with the page Attached zone in the building wizard.
